

VPN is an option people seek who value their privacy and want to stay anonymous while browsing the web. It's also the most effective way to access websites and content that are restricted at your location. However, setting up a VPN can be a bit tricky, especially for Apple users. Apple devices come in different forms, such as the iPhone, Mac and Apple TV.
The process of connecting to a VPN can vary from one device to another, making it even more challenging. In this series of articles, we have been guiding you on how to set up a VPN on various Apple products. We already showed you how to set it up on an Apple iPhone and also a Mac. This article will walk you through the steps to get your VPN up and running on Apple TV.
Setting Up and Using VPN on Apple TV
First things first, it is important that you choose a secure VPN provider. Make sure to select a VPN provider that offers encryption, has robust privacy policies, offers a wide range of server locations, and most importantly, is available within your budget. Some popular VPN providers to consider are ExpressVPN, NordVPN, ProtonVPN etc.
Time to move on to the actual business of setting it up. There are a couple of ways you can set up a VPN on Apple TV. This article will cover how you can do it using Smart DNS. You will need a VPN that works well with Apple TV and has the Smart DNS feature like ExpressVPN.
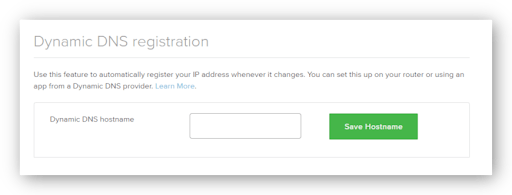
- If you have an IP address that changes from time to time, you need to use a DDNS and obtain a static hostname first. You can do this via Dnyu.
- Fill in the registration form with your DNS hostname. You will find a Smart DNS server IP address in your VPN account.
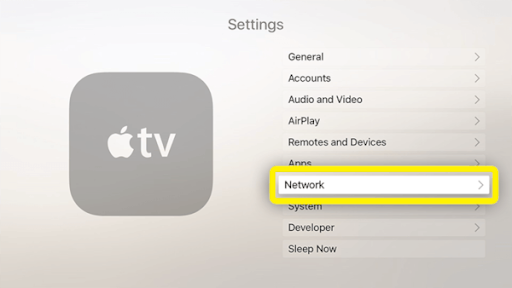
- Go to the Settings on your Apple TV.
- From Settings, go to Network and then Wi-Fi.
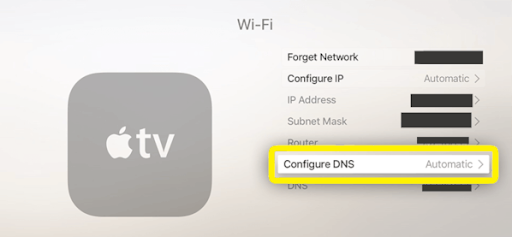
- You will find the option to Configure DNS. Select that and change the settings to Manual. Note your current DNS address here.
- In the manual DNS prompt, fill in the IP address your VPN provider gave you.
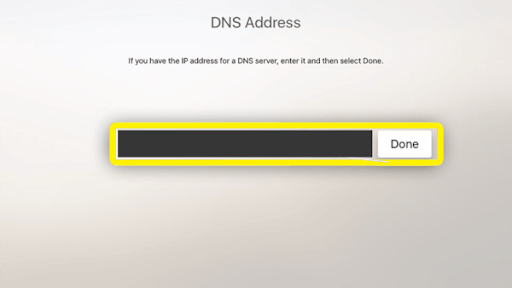
- Select Done and restart your Apple TV. You are good to go.
Tips and Best Practices
Now you know how easy it is to set up a VPN on your Apple TV, but here are a couple more useful tips you may want to consider for smooth streaming and accessing a broad variety of content.
Choosing a Secure and Reliable VPN Provider
We mentioned how choosing a VPN provider is important. Hence, research about different VPN providers available that work well with Apple TV. Check if the shortlisted ones within your budget have a good track record with positive user reviews. Also verify if they offer a reliable service and good customer support. Ensure if they have a strict no-logs policy, meaning they wouldn’t store and sell information about your browsing habits and online activities. Click here for some useful insights on choosing the right VPN provider.
Consider the server location for various needs
One of the most important factors to look out for is speed. So make sure your VPN provider has servers close to your actual location. This will help minimize latency, improve speed and provide a smooth streaming experience.
The closest and fastest available server is the ideal option most of the time, but not necessarily to get around censorship. If you want to surpass geo-blocking to access certain content not available at your location, choose a VPN provider that has servers in locations where it is available. This will help you access that specific content too.
Conclusion
Setting up a VPN on your Apple TV provides an extra layer of protection and flexibility on that device. You can now access geo-restricted content and get around censorship with ease. But keep in mind the best practices as well to have a smooth experience.